Paolo's Blog Random thoughts of a Junior Computer Scientist
On Overview of how Python works under the hoods (Part 1)
Are you sure that Python is an interpreted language? Have you ever tried to dig into the Python internal?
If you haven’t done it yet, in this post I’m going to explain to you, or at least try to give you an overview, how python works behind the scenes.
But before we start I want to point out an important concept: there is not always a one-to-one correspondence between the programming language itself and its implementation.
A programming language is a formal language comprising a set of instructions that produce various kinds of output.
While the implemenation of a programming language provides a way to write programs in that language and execute them on one or more configurations of hardware and software.
So the Python programming language is a thing and its actual implementation is another thing.
So as you might not know, there are many implementations of the python programming language: CPython, Jython, PyPy, and IronPython. The most used one and the one that I’ll treat from now is the CPython implementation. Why is it called CPython? Well because is written in C!
Contrary to what most people are saying Python is both an interpreted and compiled Language. So If you thought that Python is an interpreted language, well… you were half right.
But wait a minute… How the heck a programming language can be both interpreted and compiled?
If you know how Java works, Python is pretty similar.
When you first execute a Python script the compiler is involved in activities such as building syntax trees from source code, creating the abstract syntax tree, building the symbol tables, generating code objects, etc. After the compiler has done its job the python code is turned to bytecode, which is a particular type of code that the Python Virtual Machine, the interpreter, can understand and execute.
Here’s an Grapical overview of the process of initialization and compilation:

Compilation of the Python Code
The steps that are performed during compilation are:
- Parsing the source code into a parse tree.
- Transforming the parse tree into an abstract syntax tree (AST).
- Generating the symbol table.
- Generating the code object from the AST. This step involves:
- Transforming the AST into a flow control graph, and
- Emitting a code object from the control flow graph.
To make the PyParser_ParseFileObject function build the parse tree, the compiler has to tokenize the source code. This phase of tokenization is also called lexical analysis, which breaks the source code text into a sequence of small pieces called lexical tokens. This phase can be divided into two stages: the scanning, which segments the input text into syntactic units called lexemes and assign them a category; and the evaluating, which converts lexemes into a processed value. A token is a pair consisting of a token name and an optional token value. Common token categories may include identifiers, keywords, separators, operators, literals, and comments, although the set of token categories varies in different programming languages. Since Python doesn’t use curly braces, but instead it uses indentation for structuring the code, the indentation and dedentation must be included in the tokens of the Python programming language.
Here’s an example of how tokenization works in Python
# hello.py
def say_hello():
    print("Hello, World!")

say_hello()
$ python -m tokenize hello.py
0,0-0,0:            ENCODING       'utf-8'
1,0-1,3:            NAME           'def'
1,4-1,13:           NAME           'say_hello'
1,13-1,14:          OP             '('
1,14-1,15:          OP             ')'
1,15-1,16:          OP             ':'
1,16-1,17:          NEWLINE        '\n'
2,0-2,4:            INDENT         '    '
2,4-2,9:            NAME           'print'
2,9-2,10:           OP             '('
2,10-2,25:          STRING         '"Hello, World!"'
2,25-2,26:          OP             ')'
2,26-2,27:          NEWLINE        '\n'
3,0-3,1:            NL             '\n'
4,0-4,0:            DEDENT         ''
4,0-4,9:            NAME           'say_hello'
4,9-4,10:           OP             '('
4,10-4,11:          OP             ')'
4,11-4,12:          NEWLINE        '\n'
5,0-5,0:            ENDMARKER      ''
The tokenizer structure generated by the PyTokenizer_FromFile function gets passed to the parsetok function that attempts to build a parse tree according to the Python grammar. When the parser encounters a token that violates the Python grammar, it raises a SyntaxError exception.
This phase of compilation is often know as the Syntactic Analysis phase and involves parsing the token sequence to identify the syntactic structure of the program. The parsing phase build a parse tree, which replaces the linear sequence of tokens with a tree structure built according to the rules of the grammar which define the languange’s syntax.
The parser module provides limited access to the parse tree of a block of Python code. Here’s a basic demonstration.
import parser
from pprint import pprint

code_str = """def hello_world():
                     return 'hello world'
                 """

st = parser.suite(code_str)
pprint(parser.st2list(st))
[257,
 [269,
  [295,
   [263,
    [1, 'def'],
    [1, 'hello_world'],
    [264, [7, '('], [8, ')']],
    [11, ':'],
    [304,
     [4, ''],
     [5, ''],
     [269,
      [270,
       [271,
        [278,
         [281,
          [1, 'return'],
          [274,
           [306,
            [310,
             [311,
              [312,
               [313,
                [316,
                 [317,
                  [318,
                   [319,
                    [320,
                     [321,
                      [322,
                       [323,
                        [324, [325, [3, "'hello world'"]]]]]]]]]]]]]]]]]]]],
       [4, '']]],
     [6, '']]]]],
 [4, ''],
 [0, '']]
Once we have the parse tree, the next step in the compilation pipeline is using that tree to build of the Abstract Syntax Tree. An Abstract Syntax Tree (AST) is a tree that represents the structure of source code written in a programming language. Each node of the tree denotes a construct occurring in the source code.
The phase of building the AST is often called the Semantic Analysis phase. As the name says the AST basically represents an abstraction of the source code that is referred to. Is an abstarction of the parse tree, because its adds all the semantic information to the parse tree, which is only a syntactical construct. The AST must includes type checking, making sure a variable is declared before use which is impossible to describe and not easily detected during in the Syntactical Analysis.
One of the other advantage of the AST is that, compared to the source code, they doesn’t include inessential punctuation and delimiters.
And also an AST usually contains extra information about the program, for example it may store the position of each element in the source code, allowing the compiler to print useful error messages.
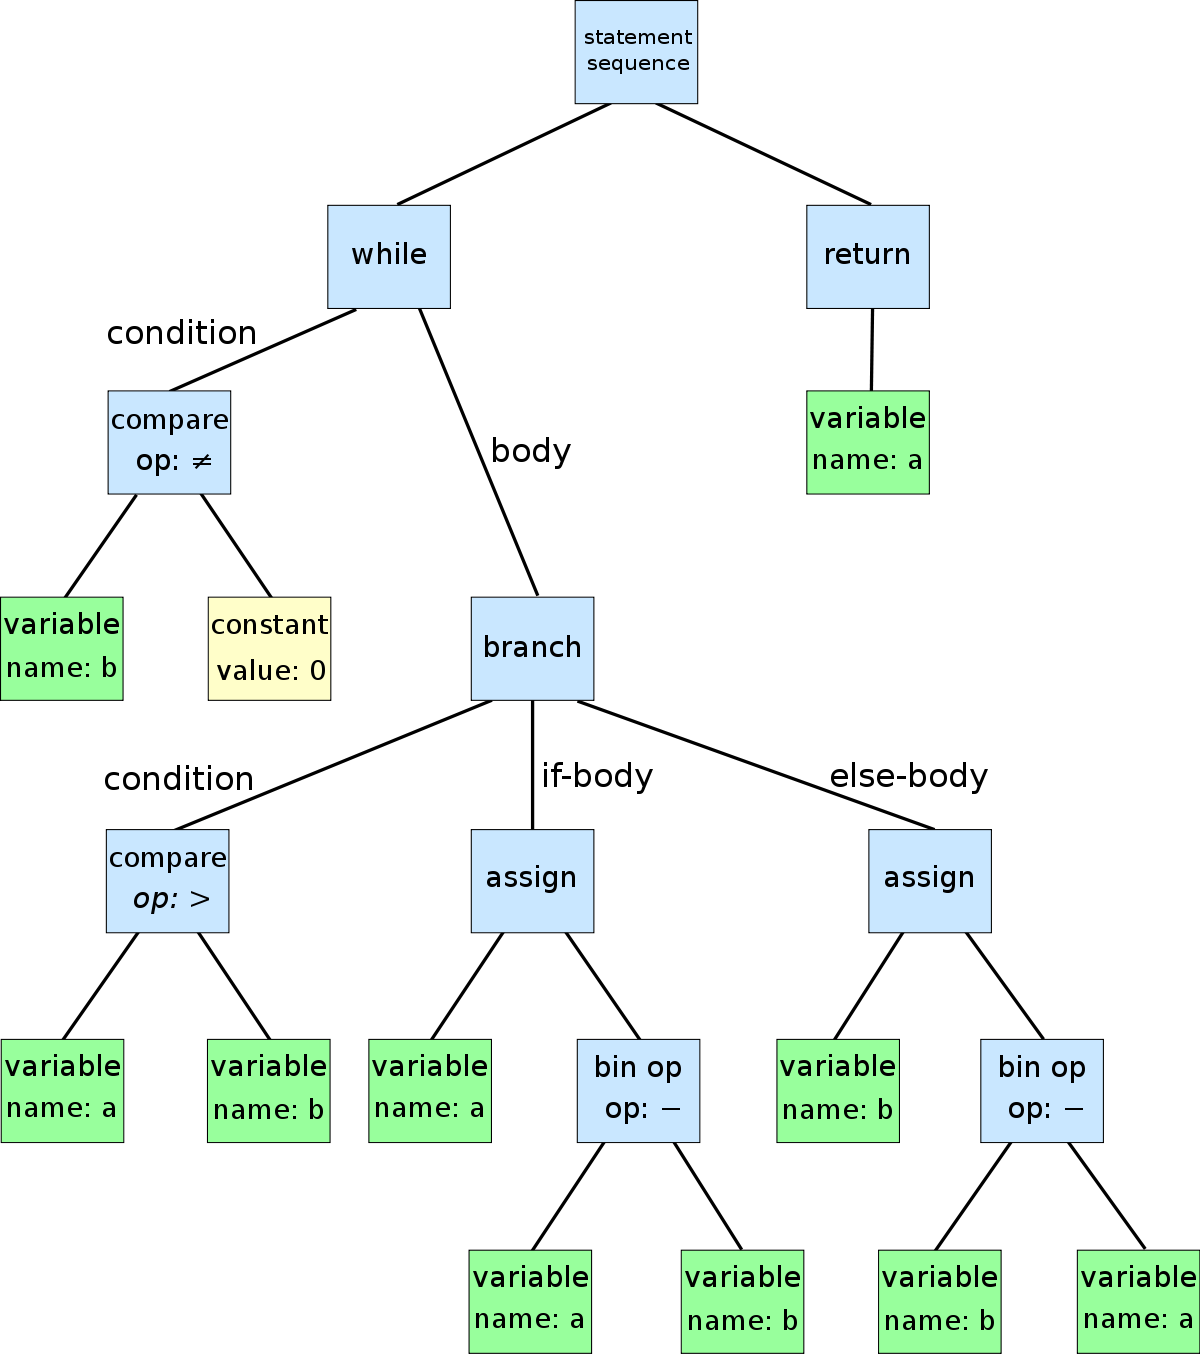
Here’s an example of what an AST looks like for the following code:
while b != 0:
    if a > b:
        a -= b
    else:
        b -= a

return a
The ast module provided by Python can help us to see
hoe AST are built in the CPython implementation:
import ast
from pprint import pprint


pprint(ast.dump(ast.parse("""\
for a in b:
    if a > 5:
        break
    else:
        continue
""")))
Module(
    body=[
        For(
            target=Name(id='a', ctx=Store()),
            iter=Name(id='b', ctx=Load()),
            body=[
                If(
                    test=Compare(
                        left=Name(id='a', ctx=Load()),
                        ops=[
                            Gt()],
                        comparators=[
                            Constant(value=5)]),
                    body=[
                        Break()],
                    orelse=[
                        Continue()])],
            orelse=[])],
    type_ignores=[])
For those of us that are more curious here’s the link to the official docs of the module: python-ast.
During the semantic analysis phase the compiler, based on the AST, generates also the symbol table. The symbol table is a data structure where each identifier is associated with information relating to its declaration or appearance in the source.
The minimum information contained in a symbol table used by a translator includes the symbol’s name, its relocatability attributes (absolute, relocatable, etc.), and its location or address.
For those who are visual learners a symbol table is something like this:

In the case of Python each symbol of the symbol table has the following attributes:
- name
- is_referenced
- is_imported
- is_parameter
- is_global
- is_nonlocal
- is_declared_global
- is_global
- is_free
- is_assigned
- is_namespace
And as you might guess CPython provides use also with a buildin package for accessing the compiler’s symbol tables. Here’s how it works:
import symtable

code = """
def factorial(x) -> int:
    facts = [1]
    for i in range(1, x + 1):
        facts.append(facts[i - 1] * i)

    return facts[x]
"""

symbol_table = symtable.symtable(code, "string", "exec")
childern = symbol_table.get_children()[0]

print(symbol_table.get_identifiers())
print(childern.get_identifiers())
dict_keys(['factorial', 'int'])
dict_keys(['x', 'facts', 'i', 'range'])
Here’s what a python symbol table looks like for the previous function:
dict_sym_table = {}
i = 0

for symbol in symbol_table.get_symbols() + childern.get_symbols():
    dict_sym_table[i] = [
        symbol.get_name(),
        symbol.is_referenced(),
        symbol.is_imported(),
        symbol.is_parameter(),
        symbol.is_global(),
        symbol.is_nonlocal(),
        symbol.is_declared_global(),
        symbol.is_local(),
        symbol.is_free(),
        symbol.is_assigned(),
        symbol.is_namespace()
    ]
    i += 1

print("{:<10} {:<15} {:<12} {:<8} {:<8} {:<10} {:<17} {:<8} {:<8} {:<10} {:<15}".format(
    'name', 'is_referenced', 'is_imported', 'is_param',
    'is_global', 'is_nonlocal', 'is_declared_global',
    'is_local', 'is_free', 'is_assigned', 'is_namespace'
))

for k, v in dict_sym_table.items():
    name, is_ref, is_imp, is_param, is_glbl, is_nlocal, is_d_global, is_local, is_free, is_assigned, is_namespace = v
    print("{:<10} {:<15} {:<12} {:<8} {:<9} {:<11} {:<18} {:<8} {:<8} {:<11} {:<15}".format(
        name, is_ref, is_imp, is_param, is_glbl, is_nlocal, is_d_global, is_local, is_free, is_assigned, is_namespace
    ))
name       is_referenced   is_imported  is_param is_global is_nonlocal is_declared_global is_local is_free  is_assigned is_namespace
factorial  0               0            0        0         0           0                  1        0        1           1
int        1               0            0        1         0           0                  0        0        0           0
x          1               0            1        0         0           0                  1        0        0           0
facts      1               0            0        0         0           0                  1        0        1           0
i          1               0            0        0         0           0                  1        0        1           0
range      1               0            0        1         0           0                  0        0        0           0
As always, for those of you that are more curious here’s the link to the official docs of the symtable package.
The last part of the compilation pipeline is the conversion of the AST previously built into the code object.
This phase is divided in two steps:
- The first step, is the building if the control flow graph.
The simplest unit of control flow in a program is a basic block—a maximal length sequence of straightline, or branch-free, code. A basic block is a sequence of operations that always execute together, unless an operation raises an exception. Control always enters a basic block at its first operation and exits at its last operation.
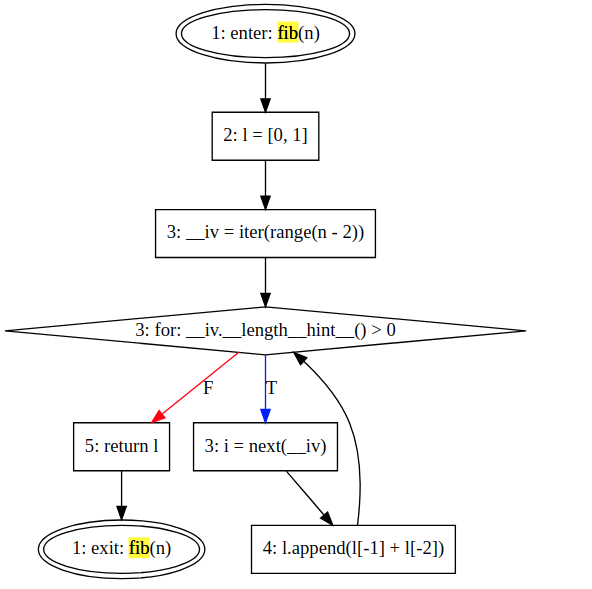
A control-flow graph (CFG) models the flow of control between the basic blocks in a program. A cfg has a node for every basic block and an edge for each possible control transfer between blocks. The CFG provides a graphical representation of the possible runtime control-flow paths.
So in Python the compiler convert the AST into basic block of Python bytecode instructions. This basic blocks have a single entry but they can have multiple exists. The blocks of bytecode here implicitly represent the CFG of that Python program.
Here’s an example of what a CFG looks life for the fibonnacci function:
def fib(n):
    l = [0, 1]
    for i in range(n-2):
        l.append(l[-1]+l[-2])
    return l
- In the second step, the algorithm flattens the control flow graph using a post-order depth-first search transversal. The bytecode instructions are then used to create a code object.
I’m not go into too much detail here, but if you really want to understand how the basic block are built and assemble you should check out the capther 3.5 of amazing online ebook Inside the Python Virtual Machine.
Now that the Python code it’s compiled, we only have to make the PVM interpret and run it! If you’re interrested more on how the Python bytecode is interpreted check out the second part of the blog post.